For this Blogger Tutorial I am going to ts how you how to set up a Blogger Blog.
Showing posts with label Blogger Tutorials. Show all posts
Showing posts with label Blogger Tutorials. Show all posts

13.2.11
How to Remove the Blogger Nav Bar
For this Blogger Tutorial I am going to show you how to remove the Blogger Nav Bar. If you really want the navigation of the Blogger Nav Bar then I suggest using the Peek-a-Boo Blogger Nav Bar Tutorial If you want the whole thing gone, then this is the tutorial for you. It's simple and easy. Log in to your Blogger account, and go to your dashboard.
![]()
Click on Layout
![]()
Click on edit HTML.
![]()
Search for this code:
![]()
Then add this code:
Right here:
![]() Click on Preview
Click on Preview
![]()
If your Blogger Nav bar disappeared then click Save Template
![]()
If not, then click Clear Edits to start over
![]()

Click on Layout

Click on edit HTML.

Search for this code:

Then add this code:
#navbar-iframe {
display: none !important;
}Right here:


If your Blogger Nav bar disappeared then click Save Template

If not, then click Clear Edits to start over

10.2.11
How to Remove Borders
For this Blogger Tutorial I am going to show you how to remove the borders on your blog. This tutorial only works with the Minima template. Do you have annoying borders hanging around the pictures in your post? Or halfway around the image in your header? I am going to show you how to remove these borders in just a few steps.

We will start by logging in to Blogger and heading to the Dashboard.

Then click layout

Then click Edit HTML

To remove the Header Wrapper border, search for this code and change the 1px to 0px

To remove the Header Inner border, search for this code and change the 1px to 0px

To change the Post Image border, search for this code and change the 1px to 0px

To change the Profile Image border, search for this code and change the 1px to 0px
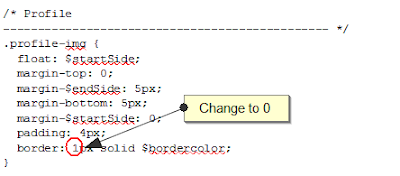 Note: To search just hold CTRL and press F. A little search box will appear at the bottom left corner of your page. Type in whatever code you are looking for. Ex: .profile-img and press ENTER. It will take you to wherever that code is.
Click Preview
 If it didn't work just click Clear Edits.
 If it did, click Save Template.
 I hope this tutorial helped. If you are wanting to learn how to do anything Blogger related let me know and I will write up a tutorial about it. Thanks for reading!

To change the Post Image border, search for this code and change the 1px to 0px

To change the Profile Image border, search for this code and change the 1px to 0px

Click Preview


14.12.10
How to enter a hyperlink in a comment
Have you ever left a comment on your favorite blog and left your blog URL? Have you ever wished that your URL was clickable or hyperlinked? It sure makes it easier for the person on the other end. All they have to do is click and they are at your blog (or whatever website you would like them to be at!) I am going to teach you how to do this in a couple easy steps. Just copy this code
And replace URL with your own URL (this can be found in the address bar of your browser.) So for example, my URL is http://www.neuffj.blogspot.com which means my code will then look like this
Now you can replace the Text with anything you like. These will be the words that are clickable or hyperlinked. So for example I want the clickable part to say My Blog Here! So my code will look like this
Anything that is written before or after this code will appear as normal and not hyperlinked or clickable. You could write a code like this
It will end up looking just like this
Come see me at My Blog Here!
I hope this helps. I would love to see some hyperlinked text in my comments if you feel like giving it a try. Leave comments if you have any questions or you can email me!
And replace URL with your own URL (this can be found in the address bar of your browser.) So for example, my URL is http://www.neuffj.blogspot.com which means my code will then look like this
Now you can replace the Text with anything you like. These will be the words that are clickable or hyperlinked. So for example I want the clickable part to say My Blog Here! So my code will look like this
Anything that is written before or after this code will appear as normal and not hyperlinked or clickable. You could write a code like this
It will end up looking just like this
Come see me at My Blog Here!
I hope this helps. I would love to see some hyperlinked text in my comments if you feel like giving it a try. Leave comments if you have any questions or you can email me!
12.10.10
How to make your blog 3 columns
For this Blogger Tutorial I am going to show you how to make your blog 3 columns. This tutorail only works with Minima templates. This takes a little bit of HTML knowledge, but isn't nearly as scary as you might think! We are going to go into our HTML code. So we'll start out by clicking on Dashboard

 Then we'll click on Edit HTML
 Next we will back up our Template incase we make any mistakes






Then we'll click on Layout


Hold CTRL and press F at the same time. A box will appear at the bottom of your screen. Type in the following code:
And hit enter, it will direct you to this part of your code:

Copy this code:
And place it beneath the #sidebar-wrapper So that it looks like this:

Hold CTRL and press F at the same time. Enter this code:
It will bring you to this part of your template:

Copy this code:
And place it directly above the 'main-wrapper', so that is looks like this:

Now hold CTRL and press F at the same time and enter this code:
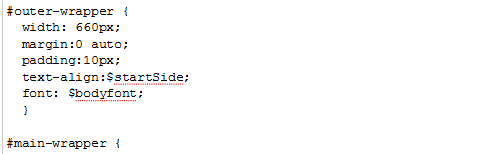
It should take you to this part of your code:

We are going to edit this code a little bit. So copy this code:
And replace the #outer-wrapper so it looks like this:

Now hold CTRL and press F at the same time and enter this code:
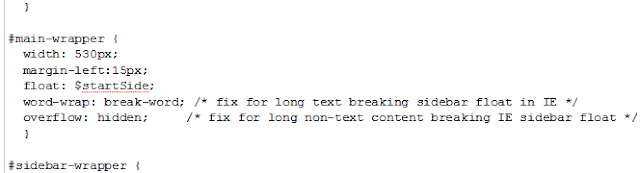
It should take you to this part of your code:

We are going to edit this code too, so copy this code:
And replace the #main-wrapper so that it looks like this:

Click preview

If everything looks okay, then click Save Template

If you have questions, please leave a comment and I will be happy to help!
11.7.10
How to add a Signature to your Blog!
For this Blogger Tutorial I am going to show you how to add a signature to your blog. This is a super fun way to add a little personality to your blog! There a lots of free ways to add signatures to your blog, but the most common way I know of is through using Live Signature. I'm going to walk you through step by step, how to create a signature using their software and add it to your blog. If you already have a signature, you can join us when we are done with Live Signature.

If you want to set up an account you can, but for what we are doing... it's not necessary.


They have LOADS of fonts to choose from and you can customize the color!

Pick a size


Now you get to Choose a Color, be sure you check the transparent background box. It makes for a cleaner look!


Pick the top option!

Then copy that code and save it!


Subscribe to:
Posts (Atom)